Connecting Actions: Workflows & APIs
By default, an Agent only performs chat completion — it generates text responses based on its instructions and conversation history. To let the Agent interact with external systems, trigger automated pipelines, or retrieve live data, you must attach Actions.
No Actions = Chat-Only Mode
If no Actions are configured, the Agent responds purely based on its Orchestrator's LLM knowledge. It cannot access external data or trigger processes.
Navigating to the Actions Tab
- Open the Agent in the Agent Builder.
- In the left pane, click the Actions tab (next to Details).
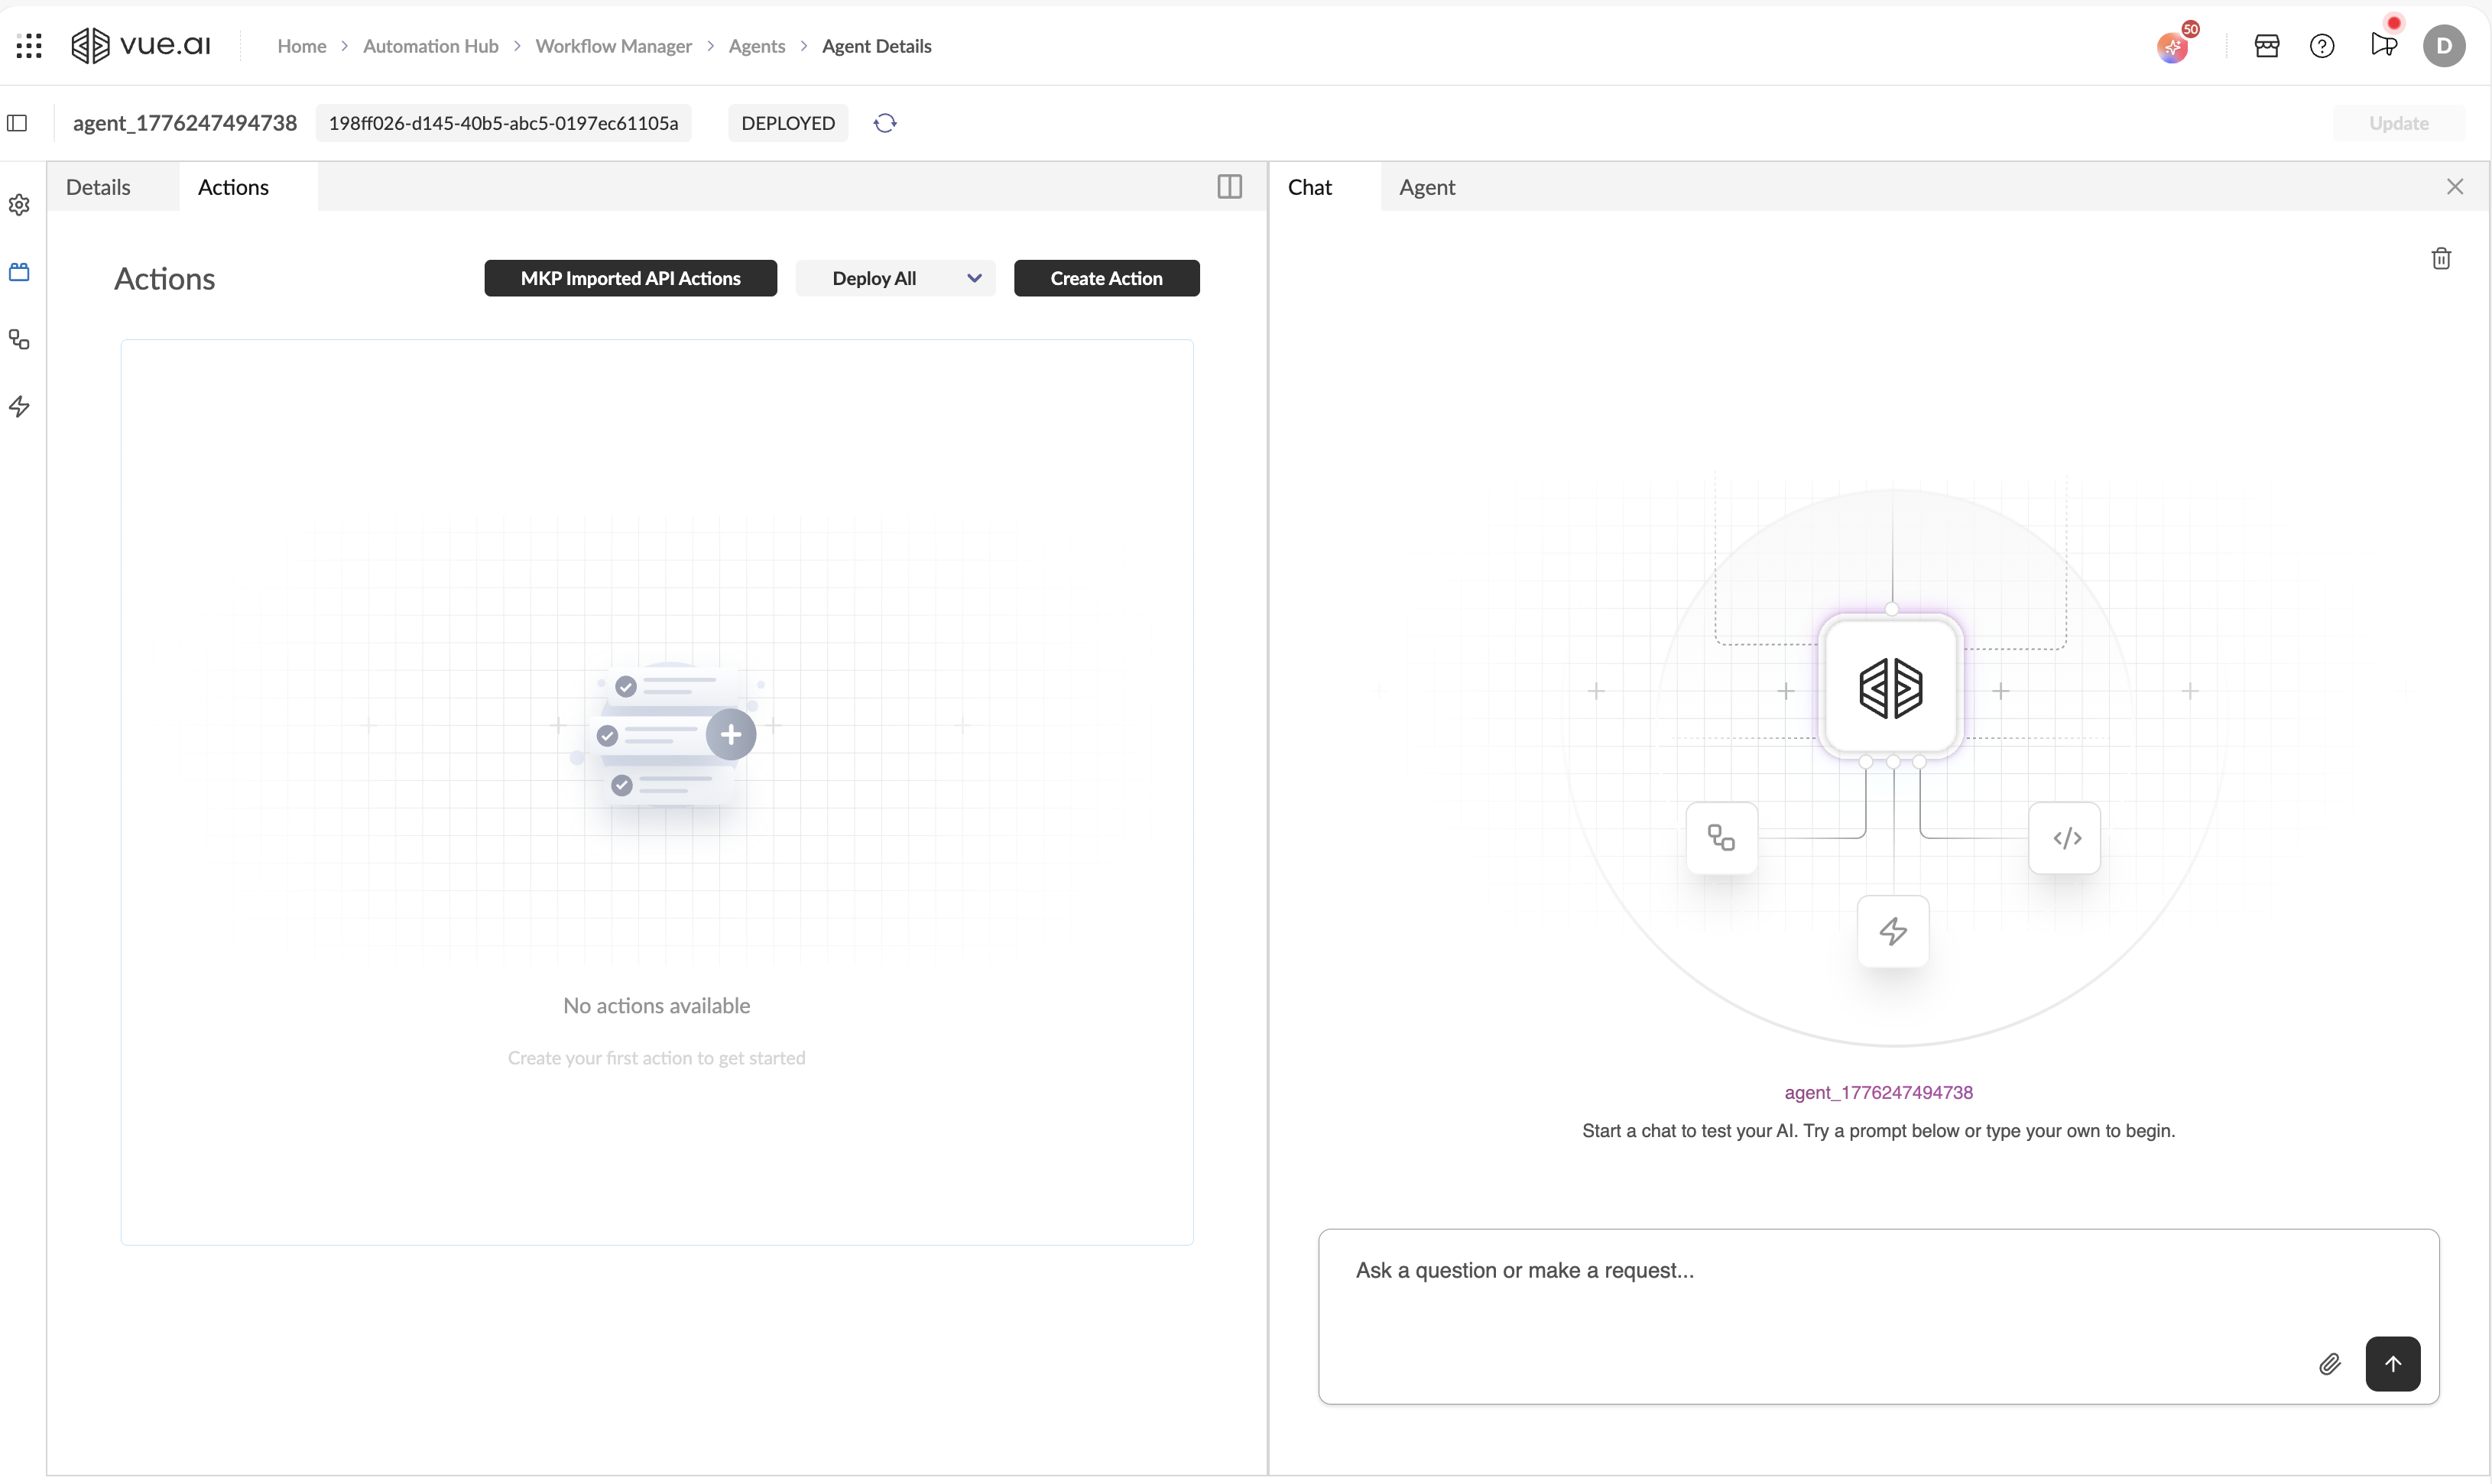
Actions Tab Controls
| Button | Description |
|---|---|
| MKP Imported API Actions | Import pre-configured API actions from the MKP (Marketplace) library. |
| Deploy All | Deploys all workflow actions at once. For each action, this will deploy the corresponding workflow. Has a dropdown arrow to undeploy all workflow actions. |
| Create Action | Opens the Action creation form. |
When no Actions exist yet, the page shows an empty state illustration with the text "No actions available — Create your first action to get started."
Creating an Action
Click Create Action to open the creation form. This form appears as a new tab in the left pane.
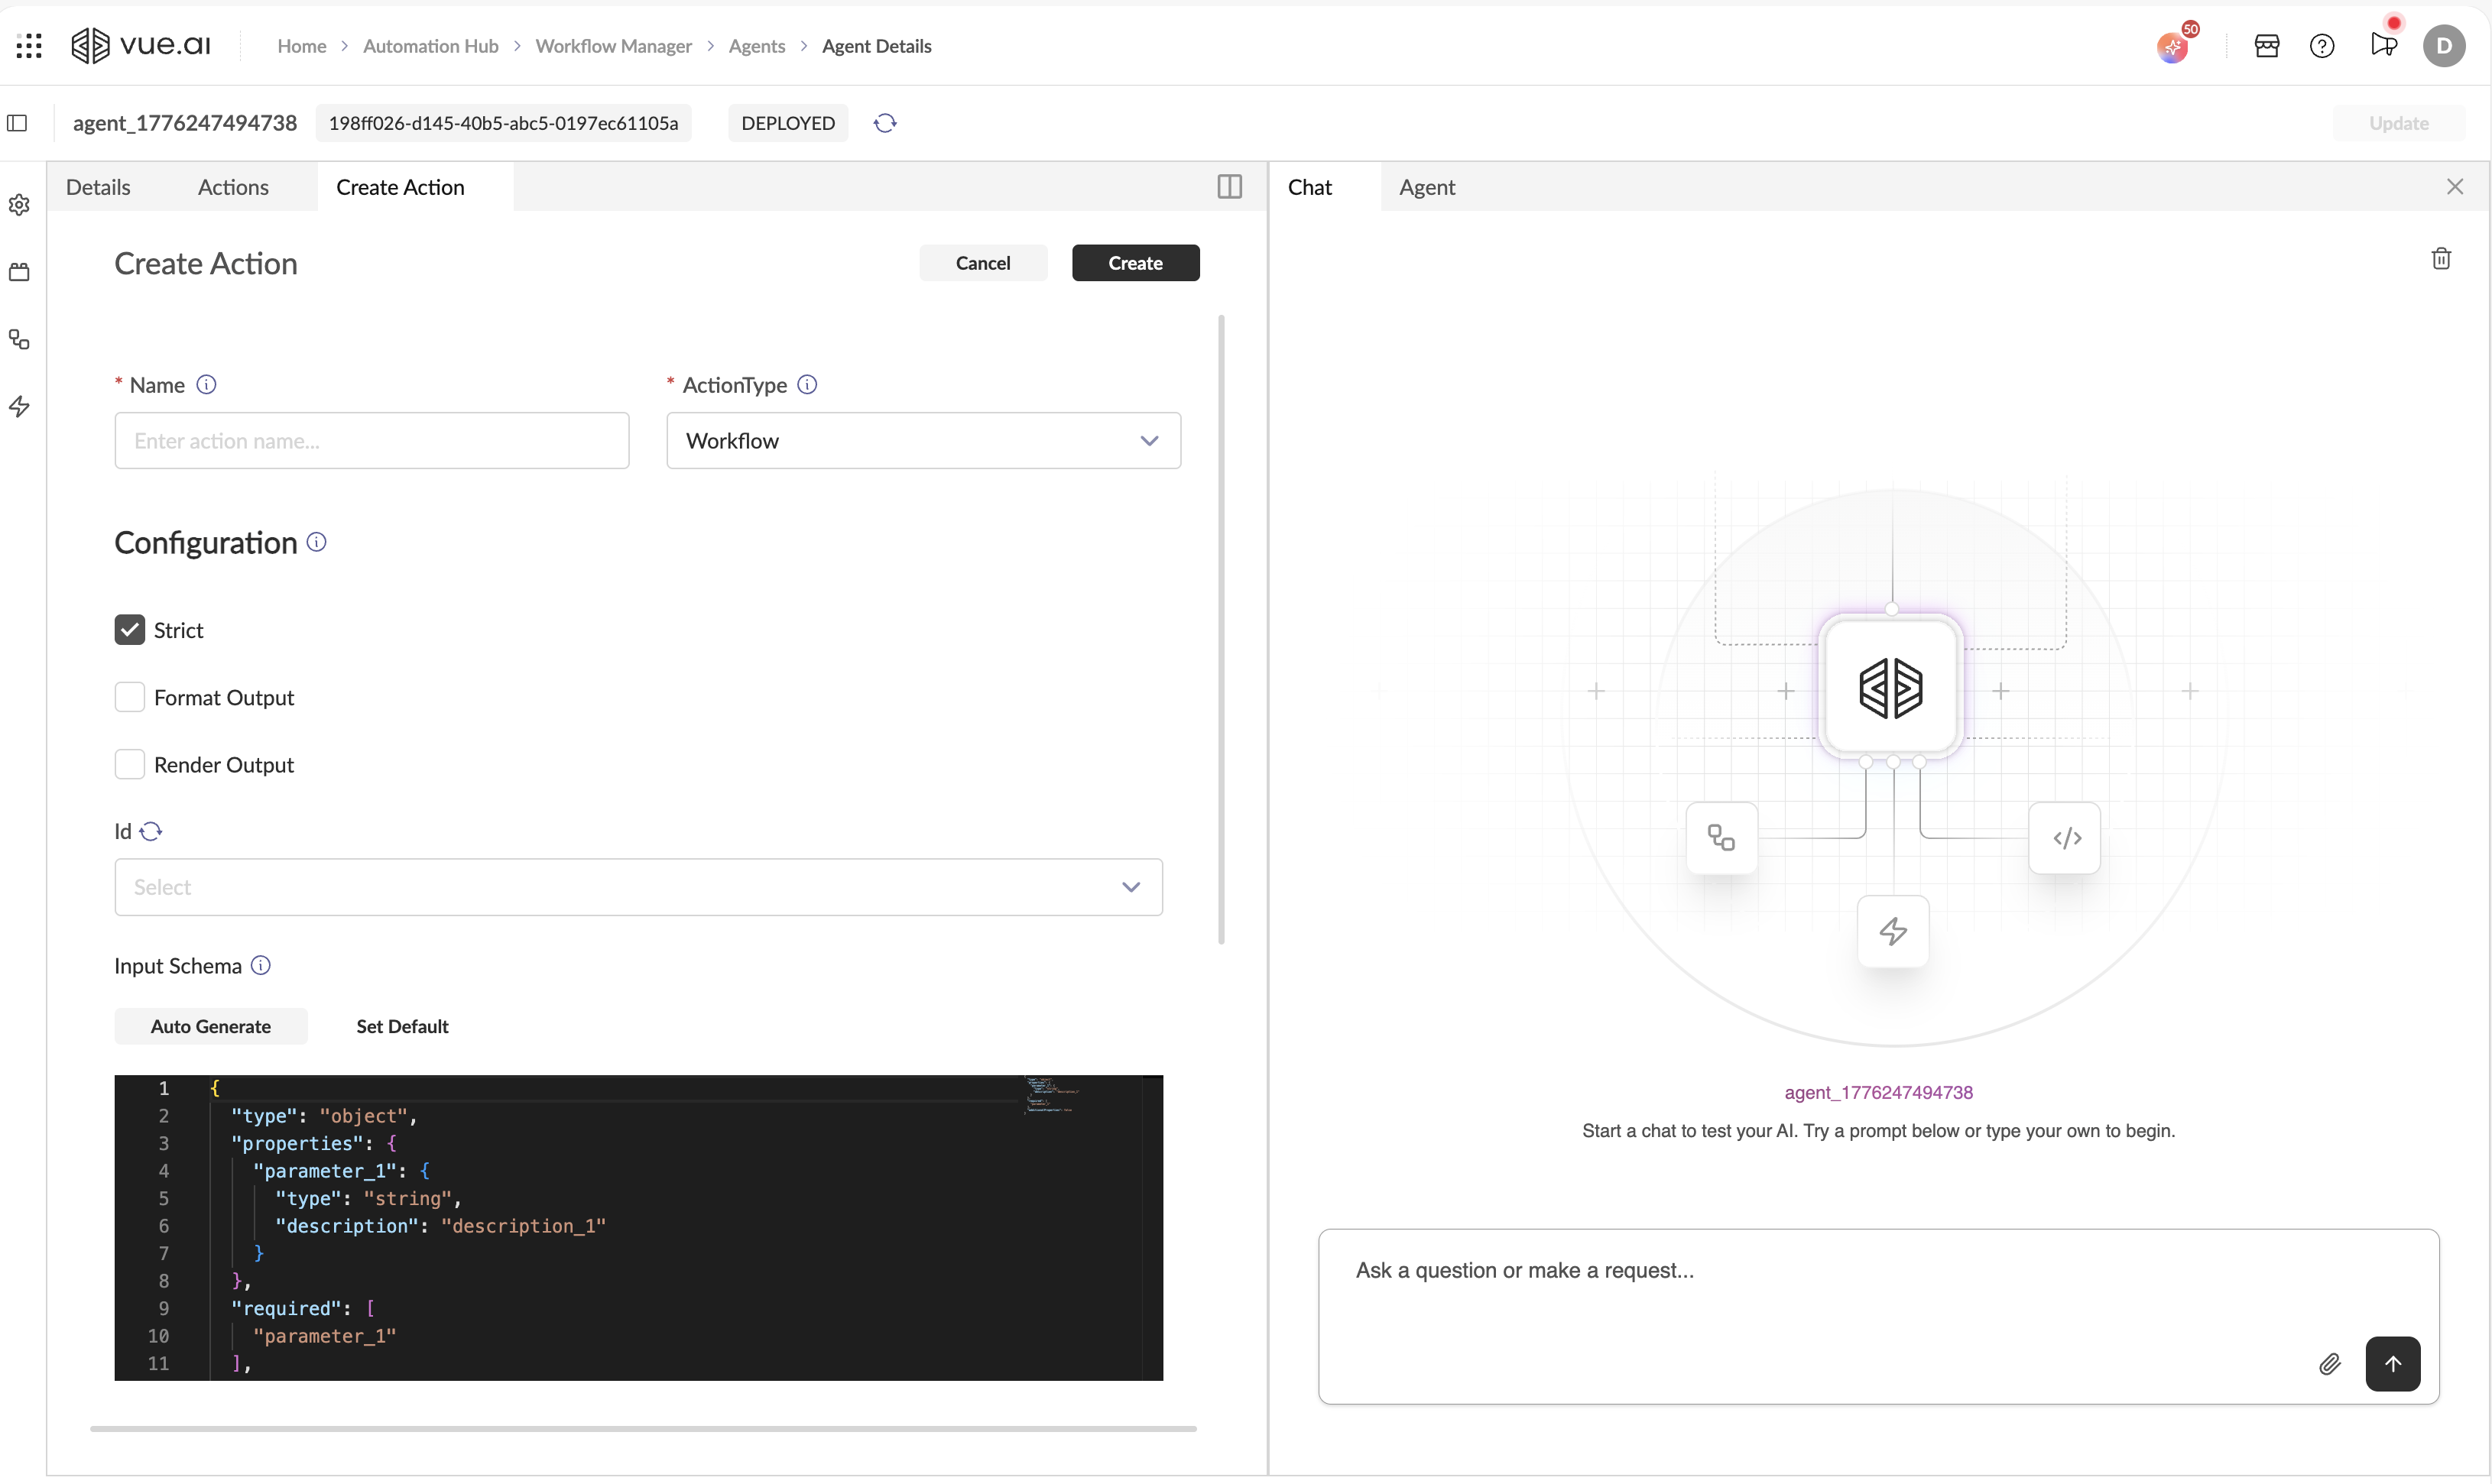
Action Identity Fields
| Field | Required | Description |
|---|---|---|
| Name | ✅ Yes | The action name. This is what appears in the action list and is passed to the LLM so it can decide when to trigger this action. Use a clear, descriptive name (e.g., Fetch_Customer_Orders, Validate_KYC_Document). |
| ActionType | ✅ Yes | The type of action. Choose from the dropdown: Workflow or API. |
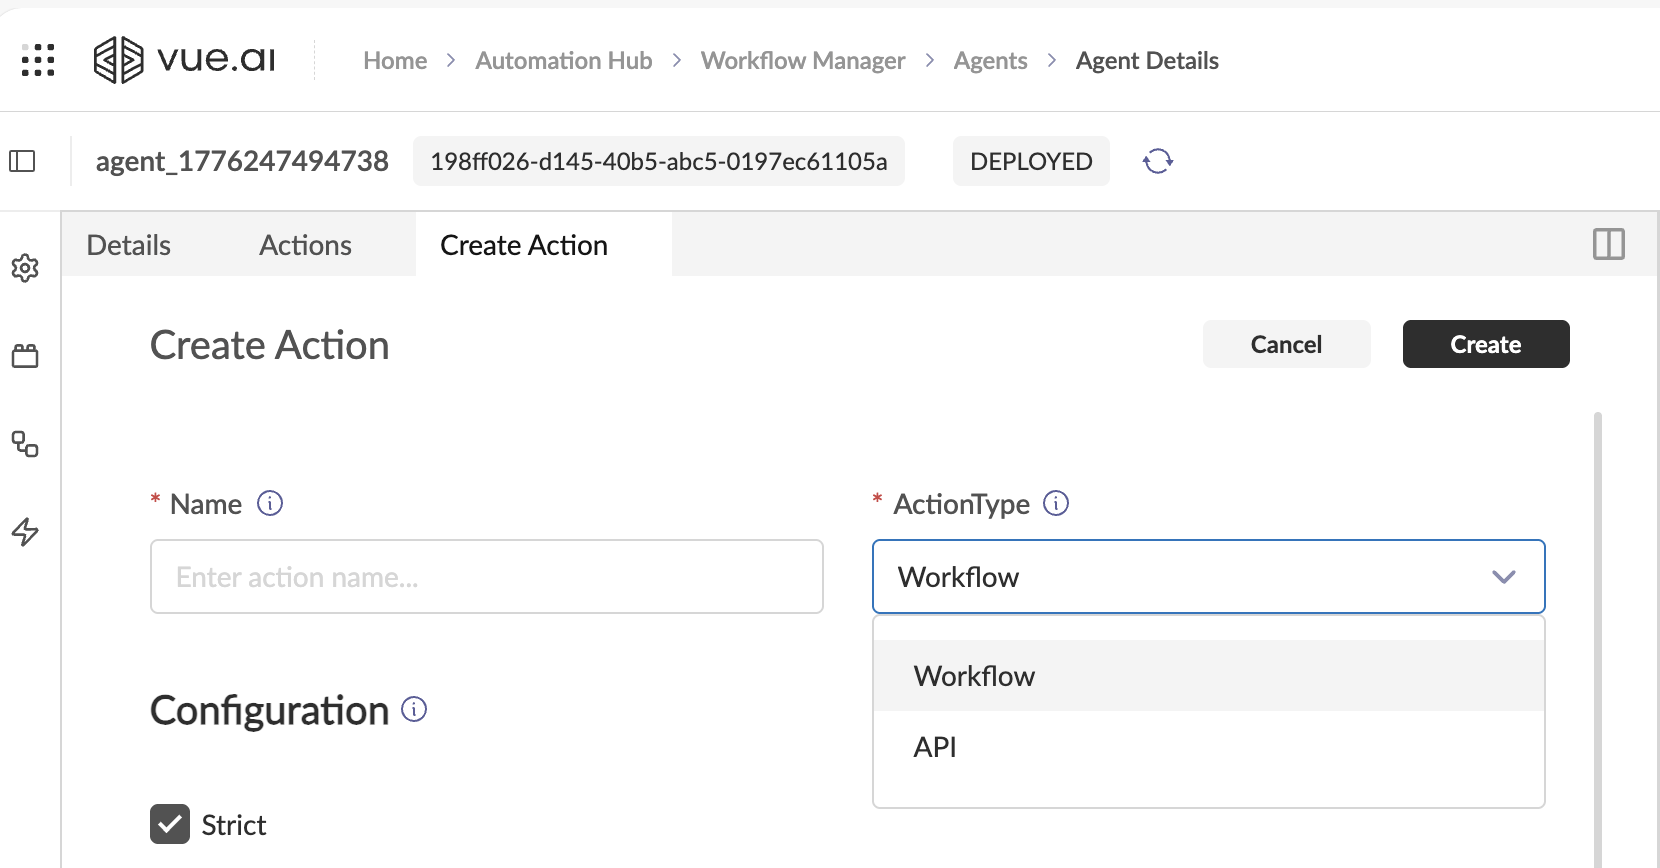
Action Type: API
Select API from the ActionType dropdown to connect an external HTTP endpoint as a tool.
The form is similar to the Workflow action type with the same configuration fields (Strict, Format Output, Render Output) and the same Input/Output Schema editors. The key differences:
Instead of a Workflow Id dropdown, you configure the HTTP endpoint details directly.
API Configuration Formats
The API endpoint can be configured in two formats:
HTTP Object
A structured form where you enter each part of the API call separately:
| Field | Description |
|---|---|
| URL | The full endpoint URL. Use {{parameter_name}} for dynamic values (e.g., https://api.example.com/users/{{user_id}}). |
| Method | HTTP method: GET, POST, PUT, DELETE, etc. |
| Headers | Key-value pairs for request headers (e.g., Authorization: Bearer [[auth_secrets.auth_token]]). |
| Query Params | Key-value pairs appended to the URL as query parameters. |
| Route Params | Dynamic path segments. |
| Data | Request body (for POST/PUT). Use {{parameter_name}} for dynamic injection. |
HTTP Curl
Alternatively, paste the full API call as a curl command:
curl -X POST https://api.example.com/verify \
  -H "Authorization: Bearer [[auth_secrets.auth_token]]" \
  -H "Content-Type: application/json" \
  -d '{"name": "{{customer_name}}", "id_number": "{{document_number}}"}'
Dynamic Parameter & Secret Injection
The API configuration supports dynamic value injection using double curly braces:
| Source | Syntax Example |
|---|---|
| User-provided input (defined in action input schema) | {{parameter_name}} |
| Account Secrets | {{secret.secret_name.key}} |
Using Secrets
You can securely reference sensitive values (like API keys or tokens) stored in your account using the secret placeholder syntax. This allows you to authenticate API calls without hardcoding credentials.
- Use plain secret names (letters, numbers, underscores) for maximum compatibility.
- For details on how to create and manage these values, see the Secrets Management Guide.
Using User-Provided Parameters
Any parameter that the Agent should dynamically populate from the user's message must be wrapped in double curly braces: {{parameter_name}}.
Crucially, the parameter names you use here must exactly match the property names defined in your Action Input Schema. If there is any mismatch (for example, using {{customer}} when your schema property is customer_name), the value will not be passed correctly to your action.
Best Practice: Always copy parameter names directly from your Input Schema when referencing them in your API configuration or workflow payloads. This ensures seamless, bug-free mapping between user input, the agent, and your action logic.
Example: Using User Input and Secrets in an API Request
Suppose you want to call an API that requires a user-provided customer_id and an API key stored as a secret (used in the headers).
1. Action Input Schema Example
{
  "type": "object",
  "properties": {
    "customer_id": {
      "type": "string",
      "description": "The unique ID of the customer"
    }
  },
  "required": ["customer_id"]
}
2. API Configuration Example
{
  "method": "POST",
  "url": "https://api.example.com/customers/get",
  "headers": {
    "x-api-key": "{{secret.customer_api_secret.api_key}}",
    "Content-Type": "application/json"
  },
  "body": {
    "customer_id": "{{customer_id}}"
  }
}
3. Equivalent cURL Example
curl -X POST "https://api.example.com/customers/get" \
  -H "x-api-key: {{secret.customer_api_secret.api_key}}" \
  -H "Content-Type: application/json" \
  -d '{"customer_id": "{{customer_id}}"}'
{{customer_id}}will be dynamically populated from the user’s input (must match your input schema).{{secret.customer_api_secret.api_key}}will be replaced with the value ofapi_key.
API Callback Passthrough
Whenever enable callback passthrough is enabled for an API action, the internal callback is skipped. This allows you to use the callback details to trigger an external callback endpoint when the operation is complete.
Callback Payload Instructions
The API should use the following variables to trigger the Vue agent's callback endpoint:
Required Attributes and Variables:
- URL -
{{VUE_CALLBACK.URL}} - Headers -
{{VUE_CALLBACK.HEADERS}}(Returns a dictionary of headers)
{
    "x-client-id": "client_id_value",
    "x-client-name": "client_name_value",
    "x-packet-id": "current_job_id_value",
    "x-api-key": "api_key_value"
}
Header Keys as Individual Variables: All the above header keys are required for the callback to work. If needed, you can retrieve each value individually:
- CLIENT_ID:
{{VUE_CALLBACK.HEADERS.CLIENT_ID}} - CLIENT_NAME:
{{VUE_CALLBACK.HEADERS.CLIENT_NAME}} - PACKET_ID:
{{VUE_CALLBACK.HEADERS.PACKET_ID}} - API_KEY:
{{VUE_CALLBACK.HEADERS.API_KEY}}
Requirements for the receiving endpoint:
- Must return a 2xx status code to acknowledge receipt.
- Must accept a
Content-Type: application/jsonheader. - Your firewall must allow incoming requests from the service IP range.
Action Type: Workflow
Select Workflow from the ActionType dropdown to attach an existing Vue platform pipeline as a tool for your Agent.
Configuration Section
After selecting Workflow, the following configuration fields appear:
| Field | Description |
|---|---|
| Strict | Checkbox (checked by default). When enabled, the Agent will not invoke this Action unless every required parameter defined in the Input Schema has been explicitly provided by the user. If parameters are missing, the Agent will ask the user follow-up questions to collect them. |
| Format Output | Checkbox. When enabled, the raw output of this specific Action will be processed through a Formatter to convert it into clean markdown or human-readable text. This uses its own Formatter Config and is completely separate from the agent-level Format Responses setting (which only applies to direct Orchestrator chat completions). |
| Render Output | Checkbox. When enabled, the raw output of this specific Action will be processed through a Renderer to convert it into rich chat UI components (forms, cards, charts, quick replies). This uses its own Renderer Config and is completely separate from the agent-level Render Responses setting. |
Workflow Selection
| Field | Description |
|---|---|
| Id | A dropdown with a refresh/reload icon. Select the specific Workflow from your Vue workspace to bind to this Action. The dropdown lists all available Workflows by their ID. |
Input Schema
The Input Schema defines the JSON structure of parameters the Agent must extract from the user's message and pass to the Workflow.
If your action does not require any input parameters, you should use the following minimal schema:
{
  "type": "object",
  "properties": {}
}
Controls:
| Button | Description |
|---|---|
| Auto Generate | Automatically inspects the selected Workflow and generates the Input Schema based on its expected inputs. |
| Set Default | Resets the schema to the default template. |
Default Input Schema template:
{
  "type": "object",
  "properties": {
    "parameter_1": {
      "type": "string",
      "description": "description_1"
    }
  },
  "required": [
    "parameter_1"
  ],
  "additionalProperties": false
}
The schema follows JSON Schema format. Each property's description is critical — the LLM reads it to understand what data to extract from the user's message for that parameter.
Example — A KYC Verification Workflow:
{
  "type": "object",
  "properties": {
    "customer_name": {
      "type": "string",
      "description": "Full legal name of the customer as it appears on their ID document"
    },
    "document_type": {
      "type": "string",
      "enum": ["passport", "drivers_license", "national_id"],
      "description": "Type of identity document being verified"
    },
    "document_number": {
      "type": "string",
      "description": "The unique number on the identity document"
    }
  },
  "required": ["customer_name", "document_type", "document_number"],
  "additionalProperties": false
}
Output Schema
The Output Schema defines the data structure the Workflow returns to the Agent after execution.
Controls:
| Button | Description |
|---|---|
| Auto Generate | Auto-generates the schema based on the Workflow's output definition. |
| Set Default | Resets to the default template. |
Action Payload Structure
When triggering a workflow as an action from the agents framework, the action payload contains the following internal fields:
{
  "query": "<user query>",
  "chat_id": "<unique session ID>",
  "client_id": "<client identifier>",
  "user_id": "<user identifier>",
  "agent": "<agent configuration object>",
  "context": "<list of context messages>",
  "action_name": "<name of the workflow action>",
  "chat_state": "<current chat state object>",
  "parent_job_id": "<parent job ID for this processing step>",
  "payload": {
    "ui_context": {
      "urlContext": "<agent context in the UI>"
    }
  }
}
Field explanations:
- query: The current user query.
- chat_id: The unique identifier for the chat session.
- client_id: The client identifier.
- user_id: The user identifier.
- agent: The details of the agent (serialized).
- context: The list of context messages.
- action_name: The name of the action that was called.
- chat_state: The current chat state.
- parent_job_id: The job ID associated with the current processing step.
- payload: Contains the UI context.
Accessing the Payload in the First Node of an Action
To access the payload described above inside the first node of the action workflow, you can use the following code inside your main module:
previous_node_name = list(payload['payload'].keys())[0]
action_payload = payload["payload"][previous_node_name]["result"]
Use this pattern to access the action payload in the first node of your workflow.
All Input Parameters Are Top-Level Fields
All input parameters required to trigger a workflow as an action will appear as top-level fields in the action payload. This means that, in addition to the standard fields above, each parameter defined in your action's input schema will be present at the first level of the JSON object, making it easy for the workflow to access them directly.
For example, if your action expects parameters like customer_name or document_type, those will be included alongside the other fields at the root of the action payload.
Important: Ensure that none of your input parameter names clash with the internal keys used in the payload (such as query, chat_id, client_id, user_id, agent, context, action_name, chat_state, parent_job_id, or payload). Using the same name for an input parameter and an internal key can lead to unexpected behavior or data being overwritten.
How the Agent Framework Handles Action Responses and Notifications
The agent framework automatically manages user notifications based on the duration of the action, for both APIs as actions and workflows as actions:
Long-running jobs:
If a workflow action or API action takes significant time to complete, the agent framework will automatically notify the user in the chatbot once the job finishes, including the action’s response.Short-running jobs:
For quick actions, no notification is sent. The response is shown immediately in the chatbot as a regular message.
For workflows as actions, you also have the option to send additional custom notifications (such as progress updates or prompts for user intervention) during workflow execution. See the next section for details.
Custom Notifications from Your Workflow Action
In workflows triggered as an action, you have the ability to send notifications directly from within your workflow. These notifications will be displayed to the user in the chatbot interface.
This feature is especially useful in the following scenarios:
Long-running workflows:
When a workflow takes significant time to complete, you can send progress notifications to keep the user informed about the current status.User intervention required:
If an intermediate step in the workflow requires the user to perform an action, such as verification, login, or approval - you can send a notification prompting the user. In these cases, your workflow should:- Send a notification to the user via the chatbot, prompting them to complete the required step.
- Pause workflow execution and implement a polling mechanism within your workflow that periodically checks for the completion of the user event (e.g., by querying an API, database, or monitoring a status flag).
- Resume the workflow automatically once the user event is detected as complete.
This approach allows your workflow to handle asynchronous, user-driven steps while providing real-time feedback and a seamless experience in the chatbot.
How to Send Notifications from Your Workflow
Use the following helper functions to send a notification to the user from within your workflow action:
import time
import requests

def send_notification(
    logger,
    title: str,
    body: str,
    chat_id: str,
    job_id: str,
    client_id: str,
    user_id: str,
    agent_id: str,
    agent_url: str,
    client_name: str = "",
    icon: str = "",
    url: str = "",
    priority: str = "medium"
) -> requests.Response:
    """
    Sends a notification to the chatbot user from within a workflow action.

    Args:
        logger: Logger instance for logging info.
        title: Notification title.
        body: Notification message body.
        chat_id: Chat session ID.
        job_id: Job or message ID.
        client_id: Client ID.
        client_name: (Optional) Client name.
        user_id: User ID.
        agent_id: Agent ID.
        agent_url: Base URL for the agent service.
        icon: (Optional) URL to an icon image.
        url: (Optional) URL to redirect the user.
        priority: (Optional) Notification priority (default: "medium").

    Returns:
        requests.Response: The HTTP response from the notification API.
    """
    payload = {
        "title": title,
        "body": body,
        "icon": icon,
        "url": url,
        "priority": priority,
        "chatId": chat_id,
        "agentId": agent_id,
        "messageId": job_id
    }
    notify_url = f"{agent_url}/api/v1/agents/notifications/publish"
    headers = {
        "Content-Type": "application/json",
        "x-client-id": client_id,
        "x-client-name": client_name,
        "x-user-id": user_id,
    }
    start = time.time()
    response = requests.post(notify_url, headers=headers, json=payload)
    logger.info(f"Notification sent: {payload} | Response: {response.text}")
    logger.info(f"Time to send notification: {time.time() - start:.2f}s")
    response.raise_for_status()
    return response
import os
import requests

def get_agent_host() -> str:
    """
    Retrieves the Agent host URL from Stephanie's service endpoints.
    Requires STEPHANIE_HOST and STEPHANIE_API_KEY to be set as environment variables.
    """
    stephanie_host = os.getenv('STEPHANIE_HOST')
    stephanie_api_key = os.getenv('STEPHANIE_API_KEY')
    if not stephanie_host or not stephanie_api_key:
        raise EnvironmentError("STEPHANIE_HOST and STEPHANIE_API_KEY must be set in environment variables.")
    url = f"{stephanie_host}/api/v1/configs/app_config/blox-service-endpoints"
    response = requests.get(url, headers={"Authorization": stephanie_api_key}, timeout=60)
    response.raise_for_status()
    return response.json()["data"]["agent"]
Usage Example:
agent_url = get_agent_host()

send_notification(
    logger=logger,
    title="Test Notification",
    body="Notification from Action Workflow",
    chat_id=action_payload["chat_id"],
    job_id=action_payload["parent_job_id"],
    client_id=action_payload["client_id"],
    user_id=action_payload["user_id"],
    agent_id=action_payload["agent"]["id"],
    agent_url=agent_url
)
Fetch Arguments from Action Payload
All arguments to send_notification should be fetched from the action payload provided to your workflow node.
- Specifically,
job_idshould be set to theparent_job_idfield from the action payload. - Other arguments such as
chat_id,client_id,user_id, andagent_idshould also be extracted from the corresponding fields in the action payload. - Ensure
STEPHANIE_HOSTandSTEPHANIE_API_KEYare set in your environment if you use a helper to fetch the agent host URL. - For best performance, cache the value of
agent_host(the result ofget_agent_host()) in your workflow, so you do not make a network call every time you send a notification. This will help reduce latency.
How Strict Mode Works
Strict Mode (enabled via the Strict checkbox) is the primary guardrail for preventing the Agent from triggering Actions prematurely.
With Strict Mode ON (Recommended)
- User says: "Verify my identity".
- The Orchestrator recognizes the intent matches the
Verify_KYCaction. - The Orchestrator checks the Input Schema — it requires
customer_name,document_type, anddocument_number. - The user only provided intent, not the required parameters.
- The Agent responds: "I can help with identity verification. Could you please provide your full name, document type (passport, driver's license, or national ID), and document number?"
- The user provides the missing data.
- Now all required parameters are fulfilled — the Agent fires the Action.
With Strict Mode OFF
The Agent may attempt to invoke the Action with whatever parameters it can extract (or guess), even if some required fields are missing. This can lead to Action failures or incorrect behavior.
Best Practice
Always keep Strict Mode enabled. It ensures data quality and prevents the Agent from making assumptions about missing parameters.
Per-Action Format & Render vs. Agent-Level Format & Render
It is important to understand that the action-level and agent-level Format/Render configurations serve different purposes and apply to different outputs:
| Scope | Applies To | Configured In |
|---|---|---|
| Agent-Level (Format Responses / Render Responses on the Details tab) | Direct chat completions from the Orchestrator LLM — i.e., when the Agent responds conversationally without triggering any Action. | Details tab → Formatter Config / Renderer Config |
| Action-Level (Format Output / Render Output per Action) | The raw output of a specific Action (Workflow or API) after it executes. | Action creation form → Format Output / Render Output checkboxes |
These two scopes are completely independent:
- Enabling agent-level Format Responses does not affect Action outputs.
- Enabling action-level Format Output does not affect direct Orchestrator responses.
- You can enable one, both, or neither depending on your needs.
When a per-action Format/Render is enabled, it uses the same Formatter/Renderer Config (Model, Temperature, Instructions) defined on the Details tab.
Action Description
Every action—whether it is an API or a Workflow—should include a clear, concise description.
This description is provided to the language model (LLM) as the "tool description", and is critical for:
- Helping the LLM decide when to use this action versus others
- Guiding the LLM to route user queries to the correct action
- Improving the quality and relevance of the agent's responses
- Explaining how the input schema for the action should be constructed based on context
- Providing any other information that is specific to the action.
A well-written action description directly impacts the agent's behavior and the overall user experience.
Example:
"Verifies a user's identity document (passport, driver's license, or national ID) against the provided customer details.
To trigger this action, the user must supply the full name, document type, and document number as specified in the input schema."
Best Practices:
- Write descriptions that are specific about what the action does and when it should be used.
- Clearly state what information the user must provide to trigger the action (reference required input parameters).
- Avoid vague or generic descriptions.
- If the action is specialized (e.g., "Verify a user's KYC document"), state that clearly.
- Ensure orthogonality: Each action should have a distinct, non-overlapping purpose. If multiple actions can be triggered by similar user queries, the LLM may not reliably choose the correct one, leading to degraded performance. Design your actions so that each one addresses a unique use case or intent.
Saving and Deploying Actions
After filling in all fields and defining your schemas:
- Click the Create button at the top of the Create Action form.
- The Action appears in the Actions list.
- To deploy all Actions at once, click Deploy All on the Actions tab.
- Alternatively, save the entire Agent via the Update button in the top bar.
Testing Actions via Chat
After creating and deploying an Action:
- Switch to the Chat tab in the right pane.
- Start a + New Session for a clean testing environment.
- Type a message that matches the Action's purpose (e.g., "I need to verify my identity").
- With Strict Mode on, observe the Agent:
- Recognizing the intent.
- Checking for missing parameters.
- Prompting the user to provide them.
- Executing the Action once all parameters are collected.
- Verify the output format and rendering quality.
Troubleshooting
| Problem | Likely Cause | Solution |
|---|---|---|
| Agent doesn't trigger the Action | Action description is too vague for the LLM to match. | Rewrite the Action Name and ensure the Input Schema description fields clearly explain each parameter. |
| Agent triggers the wrong Action | Multiple Actions have overlapping descriptions. | Make each Action's Name and Description distinct and specific. |
| Action fails with missing parameters | Strict Mode is off and the Agent guessed parameters incorrectly. | Enable Strict on the Action. |
| API Action returns errors | Invalid URL, authentication, or parameter wrapping. | Verify the URL, check headers, and ensure dynamic parameters use {{double_curly_braces}}. |
| Output is raw/unformatted | Format Output / Render Output not enabled for the Action, or agent-level Format/Render not enabled for direct chat responses. | For Action outputs: check Format Output / Render Output on the specific Action. For Orchestrator responses: enable Format Responses / Render Responses on the Details tab. |